How to Save Money Grocery Shopping

Often when people enter their twenties, they are excited for the promise of freedom they think living on their own will bring. After living on my own on two separate occasions in my twenties I have to say that while being in control of one’s own environment is a great experience, it also comes at a great cost. I’m not just talking about sky-rocketing rental rates and paying back student loans. I’m talking basic cost of living. It’s a sneaky little thing that no one really talks about when you’re growing up, but the moment you move out on your own you come quickly to the following harsh realization:

Food costs money.

It’s weird, right? Most of your life food just appeared on the dining room table and in the kitchen cupboards, but the actual amount of what things cost, especially when you’ve never lived on your own before, can be staggering. Eating a balanced, healthy diet can be tricky when it seems like all you can afford is packaged mac and cheese but there are a few easy steps you can take to try and save money when you hit up the grocery store.

1) Make a list. List-making is my religion (as evidenced here and here). I especially love it when I’m grocery shopping because it’s so easy to get side-tracked shopping with my stomach instead of my brain. If I stick to my list I know ahead of time exactly what it is that I need and what will keep me on budget. Make it really detailed if you need to be super strict with yourself, or if you’re looking for really specific items you need for a recipe (i.e., “one 4-oz. can of crushed tomatoes”).

2) Embrace cooking. I know it sounds strange, but most packaged foods are not only priced for the cost of manufacturing, but also for the convenience that comes with buying food that’s ready to eat.

3) C.I.Y. (Cut-It-Yourself) Consider the cost of buying pre-washed, cut-up veggies and fruit. It may seem just like pennies in the short-term, but if you switch from buying the $4 container of pre-cut melon to the $2 melon itself and cut it up when you get home, it could be saving you $48/year (of course, that’s if you do a grocery shop every two weeks, and that’s only if you’re getting a melon every time, but see how it can add up?)

4) Buy in bulk. If you can afford the extra money up front, most pantry staples such as pasta, rice, flour, sugar and many other dry goods are less expensive when bought in bulk and can be stored for a long time to make a myriad of things. By stocking up on a regular basis on these basics, you can save more in the long-term by buying only the fresh ingredients you need to make meals.

5) Coupons are your friend. Scan grocery store websites, flyers and coupon websites and store them with your grocery list so they’re handy for the next time you shop. It seems nerdy, but it can actually save you a lot of money in the long run, especially if you try to coordinate using your coupons when a particular item is on sale, or if you can take advantage of a store’s coupon-matching policy. (For more tips on how to use coupons you can check out my totally awkward coupon video here, although I did warn you it was awkward.)

Once you get a grip on the fact that living on your own does not necessarily mean a glamorous lifestyle of eating out at a hip new restaurant every night, grocery shopping be an easy (and dare I say fun?) experience. I’ve definitely found that paying close attention to the food I buy makes me appreciate my food more in the long-run and helps me be aware of what exactly it is I’m putting into my body, which is never a bad thing.

Not going to lie though. Bags of chips have definitely found a way of sneaking out of the store in my grocery cart.

Have any more tips on how to save while grocery shopping? I’d love to include them here! Comment below or drop me a line at thetwentiesproject@gmail.com.

Window Shopping: Holiday Edition- IKEA

IKEA's 2012 Holiday collection

Everyone knows that I have a bit of an obsession when it comes to IKEA but that could also be because during their holiday season the merchandise often reflects the holiday knick-knacks of my Swedish heritage. the decorations are cheap and often come in a variety of color schemes to suit your holiday decorating needs. I even have a friend whose Mom stocks up on cheap IKEA stemware and stores them in her garage for stress-free entertaining. No more worrying about those crystal champagne glasses!
Here are some of my favourite holiday-inspired IKEA items for holiday decorating and entertaining.

1) BORBY Lantern for block candle, white $19.99 CAD

This lantern suits any decorating scheme but could also be used on a buffet or even outdoors. I like the idea of changing up the color of the candle inside.

2) JULMYS Decoration, goat, straw $9.99 CAD

Who doesn’t love goats? Seriously, all the households in Sweden have one of these Christmas goats. Thanks to IKEA, you can too. Ours guards the presents under the tree.

3) JULMYS Garland, pearls, assorted colors $1.49 CAD

These pretty sparkly garlands (available in silver or red) could be used for just about anything in your house which is why they had to be included. You could use them as part of a homemade wreath, wrap them around a bannister or pool them about the bottom of a hurricane vase.

4) JULMYS  Tealight holder, clear glass $1.99 CAD

Okay, apparently I really like candle holders but this one is so sparkly and reminds me of icicles. So sue me.

5) JULFINT Table-runner, gray white $5 CAD

This table-runner is so sweet and neutral (and cheap!) it’s use doesn’t have to be limited to the dinner table. Use it to create a wintry vignette anywhere in your house. I’m thinking a coffee table or sideboard- but I think it could be nice a dresser too.

6) BÄRBAR Tray, assorted patterns $4.99 CAD

These fun patterned plastic trays are great to serve just about anything or can be used as a candle plate in a pinch.

7) GODIS Mix, glass striped, red $8.99 CAD

Serve up some Christmas cheer in an even more colorful glass or could be filled with small goodies for your younger, sweeter-toothed guests.

How to Revamp Your Old Lamps

I inherited a pair of some of my grandmothers old lamps about three years ago. They spent an embarrassingly long time in my family storage unit before being pulled out when I moved into my apartment, placed on their respective surfaces and forgotten about. Sort of. I’ve always wanted to revamp them some how but (a) didn’t have the time or (b) even though they were given to me didn’t feel I had the right to make such a huge change, or (c) didn’t want to risk doing something drastic and then hating them.

this sad little lamp is in desperate need of a makeover

Unfortunately it became increasingly apparent they were too dark and gave off – with the nearly opaque shade – too little light for my space. While my apartment is bright and full of light during the day, once the sun goes down it’s nothing but romantic mood lighting thanks to these two twin lamps. So after trolling a few DIY blogs, watching a few YouTube tutorial videos and thumbing some of my mom’s old decorating magazines I took the plunge and called my sister.

I whined about having to take such a long bus ride to the RONA on Warden and how it was so cold and how I could possibly die from a random bus crash if she didn’t agree to drive me there, and share in the experience of this lamp revamp. I gathered my lofty goals and inspired ideas and shoved them, along with my wallet, into my back pocket before skipping out to the street to wait for Alex.

If your local hardware or big box store offers paint tester cans (usually around $3 – $6) take full advantage, you shouldn’t need more than that to complete small projects like this. There is no point in buying a large quantity of paint for such a small project. Save your money for flats of Arizona Ice Tea you’re going to send me for Christmas. Kidding. Sort of.

Sadly the paint specialist at RONA informed me they did not offer paint tester cans but maybe I wanted to try spray painting them instead. Let me point out that I have never used spray paint. I’ve seen it being used but always imagined my lungs would fill with aerosal paint and I would die. I’m unlucky that way. Alex pointed out that spray paint would be easier and cheaper than her driving me around the city on my mission for tester cans, which she made quite plain was not going to be happening.

Do you know how many colours they make in spray paint? All the colours of the rainbow. I had initially wanted to paint the lamps a laquer white but after standing in front of the wall of spray paint was easily knocked off my decorating path. My apartment is painted a soft grey and I have mostly white furniture, so I suddenly felt there needed to be pops of colour in places other than the throw pillows. I’m about to admit something that totally goes against my character but I chose a warm yellow (aptly named marigold) to spray paint the lamps. Rust-Oleum Painters Touch Marigold with Gloss ($5.95) 

When I got home I laid down a two garbage bags to protect the floor (one day I will have a shed, garage or attic to do my DIY projects in) and shook the can while dancing to We Are Never Getting Back Together by Taylor Swift . For all of you novice spray painters, here is a great tip: you want to make sure you continue shaking your can and always reshake whenever you stop and start spraying again or it will come out gloopy or not at all.

the scene of the crime

You want to apply a few thin even coats and avoid intense thick coats because they will drip and run and ruin the overall aesthetic of the project. Also wait a few minutes between coats to allow the previous coat to dry somewhat, this will avoid a build up of wet paint. Hurrah!

my newly marigold lamp keeping the fishing frog and x360 controller company

I still need to haul my lazy a$$ up to FabricLand and grab some fabric for the new shades but here is the project as it stands, partially completed. Take to the comments and tell me what you think! Do you have any tips or tricks or suggestions? I’m completely open.

Basic Blue and a Candlestick, Too!

Most of the writers on our team grew up in the same little neighborhood of Toronto, Ontario and most of us still live there now. For those who are fortunate enough to live here, we are all walking distance from some fabulous restaurants, bars, and boutiques. The majority of these are local businesses that we love to support, but occasionally a chain or two creep in there to take up residence. One such chain was Pier 1.

I say was because a couple of weeks ago Pier 1 had a blowout sale to mark that after a couple of decades in our neighborhood, it was time to close it doors. Needless to say, people went crazy. Even when the markdowns started at just 20-30% off, people went nuts trying grabbing sequined cushions and scented candles and all that other good stuff that Pier 1 is known for.

Fools like me waited until the markdowns were 50-70% and the sale was in its final days before heading over to see what the hordes of people had left behind. The answer? Not much. But J and I did manage to pick up a couple of things.

Blue Pier 1 pillow

We picked up a couple of these soft blue throw pillows for about $3 each. It’s a bad photo because it was taken with my iPhone at night, but in real life the color is like a robin’s egg blue, which compliments the chocolate brown of our couch nicely. (And for those in the back piping up about the baby blue/chocolate thing being so 2005, just you wait. These two babies are just part of a much bigger, pillow-y picture.) Come on, who could say no to three dollar pillows?

Candle stick from Pier 1

We also got this lovely lady from Pier 1 for about $7. Again, the photo doesn’t do her justice, but once you see the plans I have for her, I just know you’ll appreciate her beauty. The top is thick and sturdy enough to hold a chunky pillar candle and the lines are very nice and traditional, which I think make a lovely ornate accent to a lot of the more modern-ish stuff in our living room at the moment.

You may be yawning to yourselves and thinking, “Wow, B, way to go out all out with your purchases.” But think about it. When you’re decorating on a budget it’s smart to incorporate a lot of basic and traditional items into your design so that they can easily be switched up between rooms, or when the decorating bug bites again later on down the line. I love blue, so my two sweet little throw pillows can live virtually anywhere in our apartment to compliment the blue and grey tones everywhere, and the candlestick can be great on a side table (where it currently resides), or be incorporated into an arrangement on a dining table, a sideboard, or even on the coffee table as part of a spread to entertain guests.

People can spend a lot of money investing in traditional pieces that are going to work for them throughout the years. Looking out for large markdowns on these kind of items is a smart way to shop- and a smart way to decorate.

Even though I’m sad that Pier 1 closed its doors, I have to say that I’m not sorry for attending this sale!

Do you have any awesome items that you picked up on sale lately? We’d love to hear all about them and your sale-shopping strategies. Pics encouraged, especially awesome fuzzy iPhone pics like mine! Send them our way at thetwentiesproject@gmail.com

the great couch debacle

It was approximately two months from our moving date, right around when we found out that we got the apartment, that J and I decided to tag along with our friends on a trip to IKEA. I’m always good for a trip to IKEA (I think it’s because of the Swedish in my blood!) and for some reason J likes it to so we thought we’d just go along for the ride.

The purpose of this trip, in all seriousness, was that a bunch of us were going in on a desk for our friend, who really wanted a desk for a birthday present. It wasn’t until we found the said desk and were waiting in the longest line ever that I decided to run over to the as-is section to check it out.

For those of you who have never seen the as-is section IKEA, it’s a little something like this: it’s a room that’s usually near the cash but on the main floor, just off of the warehouse. Anything that a customer has returned pretty much goes in there because a piece of IKEA furniture can’t be sold if it’s already been assembled. (Oh the irony!) On that particular day the room was practically overflowing because the staff were changing around a lot of the displays. All of the  gently used furniture that had already been assembled on the show room floor was on sale.

Including this baby:

From ikea.ca

J often talked about wanting a sectional couch as we entertain quite frequently (and by entertain I mean his buddies come over and play video games). We both liked the clean lines of the Karlstad couch and while J preferred a leather cover, we both agreed that neither of us had the inclination to take care of it properly and with two dogs in the house who are pretty much allowed to do whatever they want, it seemed like an impracticality.

J didn’t care about the colour. I was hoping for something neutral and classic- either a brown or a dark grey. A large, expensive piece like that is something we hope to keep for    a long time and my decorating style leans to pops of colour instead of colourful pieces of furniture like this:

So I went in to the as-is section and look was waiting there for me.

From ikea.ca

Okay, so it’s just the same picture again (I didn’t have the foresight to take pictures in the room.) But let’s see that photo from IKEA again, this time with the sale price.

Some people might not get as excited as I do when I see a sale, but $300 off of my dream couch seemed to be just that- a dream, especially considering IKEA very rarely has sales. (And for those of you who think my math is wrong, the Karlstad has just come down in price from $1,299)

It was that moment where J came back from the restaurant to look for me and found me in the as-is section. I jokingly said to him, “Remember how I asked you to buy me something when we went to IKEA?”

He said, “Yeah, so I bought you this ice cream” and handed over the cone he was holding.

I thanked him and pointed at the couch, “I would also like you to buy me that couch, please.”

He took a look at it, looked at the price tag and said, “Okay.”

Honestly? He must have been on drugs or something because that was just crazy talk. But it wasn’t crazy talk and we really did end up buying it, along with a funny little plant that I also found in the as-is section- just because it had a couple of brown leaves!

Now, I wouldn’t recommend buying such a large piece of furniture like that on the fly- not because I don’t love my couch, or don’t appreciate a good sale, but it was the aftermath that really got me in trouble.

See, what we didn’t take into account was that the room of our place where we thought about storing the couch temporarily became no longer available as a storage space. And we hadn’t bothered to measure our doorways, or the overhang of the ceiling of the staircase to our apartment downstairs.

You just fill in the blanks. Yeah, I know. It was not that smart.

This is one time where buying a piece of furniture that is traditionally flat-packed came in handy. We (and I mean J and my dad; I was just hovering around like a nervous helicopter) managed to unscrew one arm of the couch so we could slide it down the stairs, where it’s lived since. Half of it is in the upright position, half of it is being used as an actual sofa.

The couch, even in its split form, has held up during the two months that we’ve had it. Numerous people and dogs have bounced around it, slept on it and lounged on it, and all commented on how comfortable it is. The nubbly fabric seems really durable, holds up to doggie claws and doesn’t collect dog hair the same way our old one did. We haven’t spilled anything on it yet, so I don’t know yet how resistant it is to stains but I will let you know if/when it happens!

So advice to you young, couch-buying grasshoppers is this: when buying a major piece of furniture you must plan, plan and then plan some more. Measure everything, twice. Save your pennies. Think of everything that could go wrong, and then come up with solutions.

Then check those random sales at your favorite furniture store. You might be surprised!

mirror, mirror on the wall

It’s good to have friends who are undergoing renovations and A., a former client of mine and long-time family friend, was no exception. After almost twenty-five years of living in her beautiful four-story house she finally decided it was time to update and I was the gracious recipient of some of her unwanted furniture, including some bookcases (which I can’t wait to move into my new office!) and a couple of odds and ends including this baby:

White Wicker Mirror

As much as I’m a not-so-secret fan of the Shabby Chic style, the romance of the white wicker didn’t jive with the vision I had of my new apartment and certainly didn’t fit with J’s more masculine tastes. Not one to be daunted by a little painting, I decided that a little spray painting would do just the trick.

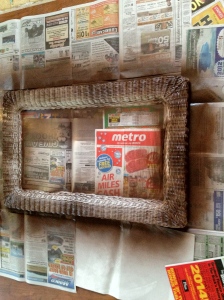
Our new apartment is going to be right near the water (can anyone say lake view?) so I settled an espresso colour to evoke a kind of beachy, tiki-torch vibe like a lot of the furnishings at a Dominican resort we went to last year. So armed with my can of spray paint and a whole whack-load of newspapers, I started in on my task.

Painting Supplies

To be perfectly honest, I never spray-painted anything before so I took my cues from Young House Love and made sure I held my can a good 8 inches away from the surface (okay, it was closer to a foot) and used a slight waving motion to spray thin, even coats which I was able to do frequently as the paint was fast-drying and according to the can, could sprayed again every fifteen minutes. I waited about half an hour each time just to be sure.

I also started with the back of the mirror so that if I needed more time to practice my spraying technique, I wouldn’t completely screw up the front of the mirror.

Back of Mirror with First Coat of Paint

My first attempt at spray painting- not bad, right?

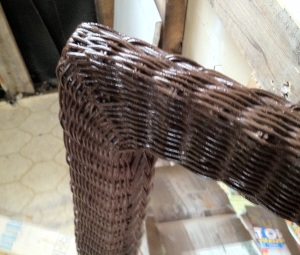
In the end, there really wasn’t anything to screw up. The paint was so dark that after three coats- applied as thinly and evenly as possible- the paint dried a beautiful colour that I would say ended up being more “chocolate” than “espresso” but was definitely more the colour that I was going for. Bonus: the wood grain of the frame of the mirror ended up showing through slightly much more than it did when it was white, so I was happy that should the mirror ever fall off of the back of the wall, any guests could admire the lovely paint job on the back.

Then it was just a matter of turning it around and doing the other side. Same thing.

First Coat of Paint on the Front

One.

Second Coat of Paint

Two.

Third Coat of Paint

Three.

And for anyone wondering, I opted not to use primer on this particular project as this particular brand boasted of a built-in primer that would coat just about any surface, and also because the surface I was spraying was so light to begin with. I think if it had been the other way around (going from dark to light) I would have used a primer to make sure none of the darker paint could show through. I did give the wicker a good wipe down with a barely-damp J-cloth just to make sure there was no dust/debris/stray bits of wicker that were going to get trapped in my paint job and look icky.

Completed Mirror

All done.

Mirror Close-Up

Gratuitous close-up.

I’ve been so happy with the results I have been madly scouring the rest of our apartment for more things to spray paint. It honestly is so addictive! Luckily, I have a few more D.I.Y. projects up my sleeve to accomplish before our big move at the beginning of May and I’ll be so busy with other stuff once we move that I’m happy to have little annoying things like this mirror taken care of.

As to where I’m going to put it, that’s going to be a secret for now. (Much like a couple of other things that are going to happen in my apartment, as described here.) In the meantime, there are a couple of other things that I can’t wait to spray paint, and already I can feel my spraying finger twitching, ready to go.

For those of you who like a budget breakdown, here it is:

Newspapers: Free

Can of spray paint: around $8 (I picked it up on sale at Canadian Tire a few weeks ago)

Mirror: F-R-E-E

Total cost: $8

Not bad considering I think a similar mirror would retail for a lot more. Everyone might not like the idea of a wicker mirror, but in the space where it will live, there are a lot of furnishings and accessories that have clean, modern lines and although it’s a uniform colour, I like the idea of adding some texture into the room. Plus, I am a firm believer in incorporating natural materials into decor whenever possible. (Can you tell that I miss having houseplants?)

Next up: matching wicker accessories? I’m looking at you.

Do you have the urge to spray paint something like B? Got any more ideas as to what she should paint next? Or maybe you have a spray paint horror story to share. Let us know at thetwentiesproject@gmail.com and your story could be featured in an upcoming article of ours!

the hidden cost of moving

It’s no secret that moving costs a lot of money- between coughing up first and last rent, renting a truck and re-decorating your new digs, it seems like your landlord should be the one that’s paying you to live there.

Unfortunately I’ve found (after having a million moves underneath my belt) that there are all sorts of other hidden costs associated with moving that you might not be aware of…or forget about until it’s too late. I’ve listed them here so they don’t end up sneaking up on you.

1) Boxes. We all need them right? But if you don’t pack smartly, or you’re doing things at the last minute, it can be easy to fork out a hundred dollars or so to find some way to move all of your stuff. Instead, solicit donations from friends, neighbors and family members who have moved recently. Lots of people will also free cycle their old boxes on sites like Craigslist or Kijiji. Moving companies such as uHaul offer cheap box recycling programs. Clean, sturdy boxes can also be found on recycling day in front of businesses such as clothing boutiques, stationary stores or pharmacies. Liquor and beer store boxes are sturdy as well and are often easy to carry.

2) Change of address services. Unless you are the most organized person in the world and you remember every single person you’ve ever given your address to ever, you may want to buy Canada Post’s address forwarding services that will forward all stray mail to your new address. If this seems necessary, then make sure the cost is part of your moving budget. Remember to allot some money to change of address cards if you’d like to send those out as well. A cheap way alternative to these is to send out an email blast. Check for any services that allow you to schedule a change in address ahead of time to relieve some of the stress of changing it everywhere. Remember that it sometimes takes a couple of business days to take full effect and magazine subscriptions can take 6-8 weeks.

3) Installations. Sometimes it can be easy to get caught up in all the details of planning all your new services without remembering that installation fees are often required. Unfortunately, there’s not a whole lot you can do about these changes, so make sure you speak with your cable, phone and Internet providers to schedule these service changes ahead of time and find out how much the change of address is going to cost you.

4) Food. This seems like an odd one but I can’t believe the number of building managers and landlords that have told me that they had to throw out all of the food a rushed tenant has left behind. Things that aren’t used often such as pantry staples and condiments can often be forgotten when concentrating on moving all the perishables. It doesn’t seem like a big deal to leave them for the next person to deal with, but it can end up costing you hundreds of dollars to replace. Same goes for opting to throw out all the food in your fridge rather then bring it along with you. Avoid this by eating as many perishables and using up as many pantry staples as possible to avoid large amounts of grocery shopping right before your move. It may result on some “creative” meals or many nights of take-out but it’s worth it for the hundreds of dollars you’ll prevent from being tossed in the compost.

5) Damages. If you’re moving out of a rental place it’s always a good idea to deal with any small repairs before you leave to avoid your old landlords hunting you down for money to paint over that black living room you left for the next tenant, or replacing the screen on your balcony door. Double-check your lease to see exactly what they will hold you responsible for. Conversely, make sure you fill out a damage sport within 48 hours of moving into a rental to make sure any necessary repairs are reported to the landlord so they can take care of them instead of paying out of your own pocket.

Remember to watch out too for those nasty small costs that can creep up and blow a tight budget such as fast food, gas money and packing supplies such as packing tape, permanent markers and bubble wrap. And of course, don’t forget to set aside some money for that two-four for all of your good friends that helped you out!

Did you end up emptying your pockets for a surprise problem when you were moving? Share the love and warn us beforehand at thetwentiesproject@gmail.com!

pack it up, girlfriend

Goodwill Bag

Image from goodwillniagara.com

I don’t know about you but every time I am forced to move to yet another place my mind immediately starts thinking about decorating and furniture placement. Something about signing a lease flips a switch in my brain that turns me from blog writer to Sarah Richardson. Not that I have half the talent (or the money) that she possesses. But I do like to think I try.

The problem with these thoughts is that they tend to overwhelm me and distract me from the task at hand, which really is to prepare for my move. But when moving day is a month or so away, it can be difficult to decide where to start.

The most obvious way to start packing is to take into consideration all of the things that you don’t use on a daily basis. Unless you’re going to be using an item or need access to it before you move into your new apartment, it should probably be packed away before starting to pack the really important things.

Here’s a list of some of the ways you can start packing without missing all of your stuff.

1) Have you gone through all of your stuff to see if there are gently used items you can donate, or broken items that can be discarded? It may seem counter-productive, but you’re getting rid of items now that you’d probably end up packing later. Anti-packing kind of is like packing!

2) Holiday stuff. Unless Christmas is right around the corner, or you really cannot live without your twinkle lights, you can pack these away now.

3) Out of season clothing.  It’s better to keep layers of transitional clothing on hand than to hold off packing a coat “just in case”.

4) Spare office supplies. I doubt you’re going to go through that entire box of pens in the next couple of weeks. Same goes for any of those other nitty-gritty things like envelopes and paperclips.

5) Infrequently used kitchen items. Consider your hobbies and your schedule to see which ones you might end up using and which ones can end up being boxed up. Consider packing away versions of multiples as well. Most people probably don’t need go access their full range of muffin pans every month unless they’re filming their own version of Cupcake Diaries so it’s a safe bet you won’t miss it.

6) Books and magazines. Unless they are borrowed from a friend or from the library, any books that will not read or return between now and moving time need to be packed up. (If you’re anything like me, this is going to constitute the majority of your stuff!)

7) Photo albums and keepsakes. Although it’s fun to have those items out to show off your own personal history and taste, unless you’re feeling super nostalgic you’re not going to want to be wasting time gazing at memories of yore instead of high tailing it out of your place.

8) Out of season sports equipment. If you can pack those items up, that is. I’ve never packed a hockey stick before but I can imagine if you don’t have a creatively shaped box it can look kind of weird.

9) Extras, extras, extras! Spare bed linens, extra tea lights, those guest towels that your grandma got you not realizing you didn’t have a guest bathroom, whatever. If it doesn’t get used on a semi-regular basis, it gets packed!

Remember, if you’re really stuck on where to start, just start by accumulating packing supplies. Making sure you have boxes, newsprint, sharpies and packing tape on hand. For other tips, check out my article on getting organized to move!

Are you moving soon? Do you have a moving horror story to share? Email us at thetwentiesproject@gmail.com and we could feature your story in an upcoming article!

are you planning to redecorate your kitchen, like S?

the butterflies in question

Anyone who knows me knows I can never stick to a design plan or scheme for too long before feeling an intense urge to change it up. There is something extremely monotonous about waking up every single day to the same thing, usually it starts with moving around the furniture, maybe sliding a potted plant to the other side of the window sill before I’m resolved to stripping the paint off the walls at three am. This is pretty much how I am feeling about my kitchen. I like to thing the kitchen is one of the most important rooms in the entire house – or in my case apartment. The room is where the food lives and considering I’ve become a ravenous pig in my advanced age, I have been spending a lot more time in there.

When E and I initially moved in we came up with a design plan which included a mustard-yellow accented with brushed silver butterflies. We live within walking distance of the beach and have the luxury of feeling the cool breeze off the water during the summer (and winter, but we were not so amped about that fact) we wanted to make the kitchen as natural feelings as possible. So, ergo, choosing light summery colours for the kitchen.

It was great … for about seven months and now I want to rip each butterfly off the wall and stomp on them.

Living in a rental is a tricky business because you find yourself contending with the previous tenants poor design taste during decorating. The previous tenant in our unit had painted the kitchen a hideous shade of orange – not just the walls but everything else as well, including the cupboards – so, as you can imagine, every once and a while orange pops up to say, ‘hello!’. Orange and I have never really had a great relationship, in fact I hate her guts; she makes my skin appear death-white and turns my kitchen into Anita Bryant’s wet-dream.

So, this time, we are going all out. I figured the cabinets are going to need a new coat of paint and I’ve chosen a bright stark white for them, the same shade as the white IKEA floating shelves. I think this will give the kitchen a nice freshness it’s been lacking, painters white yellows after a few months if not updated. The yellow will be replaced by a deep teal which will not only look fantastic against the white but will serve as a beautiful backdrop to our cooking books, food jars and appliances.

I’m also working on getting E to allow me to buy a beautiful white antique birdcage to hang in the corner by the window, I think it will look great, she doesn’t understand the need for one if we do not even have a bird. She clearly has never gone antiquing before (and – to be honest – I’ve never done it properly) and fell in love with some object you have never needed. Then we will be hanging fabric swatches in matted frames to create a sort of focal point for the walls and to bring some art into the kitchen, something muted which won’t be as ‘in your face’ as the butterflies.

Damn those butterflies.

isn’t teal beautiful?

The most important part about any redecorating challenge is budget for it and really think about what you want to say about the room, this will help you avoid racking up unnecessary charges. It also cannot be something you do on a whim – which is actually a good thing – it will allow you more time properly flesh out exactly what you want to see. I think too many times you think about a redesign in parts and jump on the bandwagon long before you’ve secured wheels to it, suddenly your sitting in a rectangular box with a purple striped wall and no idea where you were going with it.

Do not forget to also pick out what accessories you want to see in the space and properly budget for them as well, this is not just about the paint and the brushes. And finally use the redecoration as an excuse to sit down with your roommate and discuss what you want to keep within the kitchen (coffeemaker, toaster and microwave) and what you can afford to lose (butterflies, lead painted fruit tray and any remnants of orange)

When E and I complete the kitchen redesign I will be uploading some photos to our facebook page and a video for our YouTube page, so look forward to those. And because I’m a masochist by design I will also be posting my budget for all to see, and judge.

Are any of you planning a redecoration? Do you have some great ideas that you are brimming to share? Email us at thetwentiesproject@gmail.com 

Pssst! Wanna see how S’s redecoration plans are coming along? Click here to read more.